 |
B++ SIMULATOR FRAMEWORK: DISCRETE VISUAL SIMULATION |
| INTRODUCTION |
The provides an object-oriented framework for discrete-event and visual simulation called B++ Simulator. C++ technology is used to model the components of the system under study and to run the full experiment, which provides fast simulation. In order to facilitate the validation and verification of the modeling, Java is used upon the C++ structure to provide a visual representation. Each component of the system can be associated with a visual component, and thus the user can supervise the running of the simulation. C++ and Java layers interact together through the technology. The visual animation can be deactivated at any time, which provides a full speed C++ model. The portability of Java and the B++ Library allows to implement visual simulation on any platform. The B++ Library also provides optimization tools that can interact directly with the simulation models.
 |
This section only proposes an overview on how to make models with the B++ Simulator framework, and gives an idea of the kind of technology that is used. The free source code and documentation of the whole B++ Library and the B++ Simulator are available to provide more precise information. Particularly, the Simulator/Urban_bus module shows how the B++ Simulator framework was used to develop a simulation model for buses in an urban network. See for details.
| SIMULATOR STRUCTURE |
The B++ Simulator framework is packed in the Simulation module of the B++ Library. It provides a class named Simulator that represents the whole simulator. This class also represents the whole model under study. Hence, to create a new simulation model, the user needs to specialize the Simulator class and override specific methods that describe the progress of the simulation experiment.
 |
A simulation experiment can be decomposed in several stages: simulator construction, experiment start, replication start, replication running, replication end, experiment end, and simulator destruction. The user can write his/her own code for any one of these steps. Simulator construction and destruction are naturally performed by the constructor and destructor of the class. Its run() method will start the simulation experiment and execute sequentially the following methods.
startExperiment()that prepares the experiment.startReplication()that prepares the replication and starts the simulation.endReplication()(called once the simulation replication is terminated) that ends the replication (e.g. deletes remaining simulation objects).endExperiment()(called once all the simulation replications have been performed) that ends the experiment (e.g. generates the report of the collected data).
These methods should be overridden to define the behavior and structure of a new simulation model. As example, one can look at the urban bus model in the Simulator/Urban_bus package of the B++ Library, see for details.
| Simulator Construction |
To create a simulator object, the constructor of the Simulator class must be called with several mandatory arguments listed here.
A Java object of class
SimulatorFramethat represents the frame where the animation of the simulation will appear and will be controlled. If no such object is provided (i.e. a nil pointer is given), then the simulation will run in console mode, without any visual representation for the simulation objects and without any graphical interface to control the simulation.An experiment file that describes all the parameters of the simulation. It is a basic association of keys (i.e. strings and more precisely words) with values (i.e. strings that can be converted afterwards to any kind of object), which can be accessed using the
parameter()method of the simulator.A boolean value to write extra information on the progress of the simulation experiment, either in the graphical interface or in the text console.
More information on the visual representation can be found in the following sections. Concerning the experiment file, one can add any parameters he/she wants for the simulation model. Here is an example of experiment file, with a list of the parameters that are required for the B++ Simulator framework to load a simulation model.
module = bpp_simulator_urban_bus


       start_running = 0

       end_running = 3000000

       start_measure = 100000

       end_measure = 3000000

       replication = 10


       text_size = 3

       speed = 75

       zombie_cleaning_frequency = 100


       data_location = c:/bruno/bpp_library/data/simulator/urban_bus


       <end>
Here is a brief explanation of these parameters.
moduleis the name of the dynamic library that contains the simulation model,start_runningis the start date of the simulation,end_runningis the end date of the simulation,start_measureis the start date for the statistical measures in the simulation,end_measureis the end date for the statistical measures in the simulation,replicationis the number of replications of the simulation experiment,text_sizeis the default size of the text in the different panels of the simulation frame,speedis the default speed of the simulation animation,zombie_cleaning_frequencyis the frequency to call the garbage collector of Java,data_locationis the location of data for the simulation.
Remark: zombie_cleaning_frequency represents more precisely the maximum number of zombie objects (i.e. the simulation objects that are not used anymore) that can be present in the system. By default, we decide to call the garbage collector each time the number of zombies in the system reaches 100. If the frequency is too high, it can slow down the simulation, and if it is too low, one can notice some jolts in the progress of the simulation.
The constructor of the Simulator class is also used to configure the simulator: pools to create simulation objects can be defined, the priority of the simulation events can be decided... See the last section on advanced features for more information.
| Experiment Start |
This method should be overridden to create any global object for the simulation experiment, such as statistical collectors for the data returned by the simulation replications, image files for the visual representation of the simulation objects (see the last section on advanced features)...
| Replication Start |
This method must be overridden to create the first simulation objects, the ones present at the start of the simulation: the static structure of the simulation model must be built and the first dynamic objects must be placed in this structure. The first events of the simulation must also be scheduled. Statistical collectors can also be created to measure performances during the simulation replication.
| Replication End |
This method should be overridden to analyze the statistical data collected during the simulation replication. Simulation objects might also need to be deleted. In fact, if the objects are physical objects, they should be part of a structural hierarchy whose top is the simulator (cf. the next section). This hierarchy is automatically destroyed at the end of a replication, and all the simulation objects inside it are also deleted.
| Experiment End |
This method should be overridden to analyze the statistical data collected among all the simulation replications. Usually the resulting information is displayed and/or stored in a file.
| Simulator Destruction |
This method might be overridden to destroy all the objects created in the constructor. By default, the pools of simulation objects created in the constructor are automatically destroyed.
| SIMULATION OBJECTS |
Any object that is handled by the simulator must inherit from the Object class of the Simulation module. All the objects that represent physical elements in the system under study, i.e. that can be located and would present some interest to be visually represented, must inherit from the PhysicalObject class. We consider then two subclasses, the objects that remain still belong to the StillObject class, and those that can move belong to the MobileObject class. Usually, to move an objet from one location to another, it uses a path that is represented here by the Path class.
 |
| Object Class |
This class represents any object that is handled by the simulator. Such objects are created by the simulator through its newObject() method and are destroyed through its deleteObject() method. For instance, let us consider the Bus class that inherits from the Object class. Such an object is created as follows.
Bus * bus;

       simulator().newObject(&bus,"line 1");
The object returned by simulator() (which is a method of any simulation object) represents the simulator, and its method newObject() calls the constructor of class Bus that requires three arguments: the simulator, the eventual pool (it is the simulator that decides to use a pool: in the constructor of the simulator, one can define a pool for Bus objects, see the last section on advanced features) and the name of the bus. The newObject() method does not return any pointer as the new instruction. It requires a variable to store the pointer to the allocated object (here it is the variable bus that points to the new object).
 |
To delete an object, you only have to call the deleteObject() method of the simulator as follows.
simulator().deleteObject(bus);The reason for not using the new and delete instructions is that it allows the simulator to decide to allocate directly the object or to use a pool. Moreover, when an object has to be deleted, it can not happen immediately after the command: during the simulation, several events that happen at the same time will be treated sequentially, and two events might use a same object that is destroyed by one of them. Its effective destruction must occur after both events have been treated. In fact, the simulator deletes objects at each time advance. Before such objects are effectively destroyed, they are called zombies.
| PhysicalObject Class |
This abstract class represents any object that should have a visual representation in the simulator. Physical objects are organized in a hierarchical structure. The simulator is a physical object that represents the whole system under study. This object can be composed of other physical objects, called its children, that represent details of this object. The component can have still children, i.e. physical objects that do not move, and mobile children, i.e. physical objects that can move. Any physical object can have children, which forms a hierarchical structure of the system. The object that contains children is seen as the parent of these objects. A mobile object can move from one parent to another.
 |
A physical object has a name, a parent (except for the simulator), and eventually children. It can be deep (i.e. the children are located inside the object: e.g. the passengers of a bus) or shallow (i.e. the children are only located upon the object: e.g. the passengers at a bus stop).
Concerning its visual representation, a physical object can be associated with a component, called its view, that belongs to the Java class VisualComponent. In order to be inspected in the graphical interface, the component also has a status, i.e. a string that describes its actual state. Methods are also available to locate the visual representation of the object. relativeX() and relativeY() methods return the location of the object relative to the location of its parent (these methods are abstract here and can be overridden, depending on how the object is moving). absoluteX() and absoluteY() methods represent the location of the object on the whole layout of the system under study.
 |
| StillObject Class |
Still objects have no particular attributes or methods. They are objects that can not move. They are distinguished from the mobile objects only for efficiency reasons: their visual representation do not need to be automatically updated as they never move.
| MobileObject Class |
Mobile objects move from one parent to another using a path. Method move() is used to start a move, indicating the path to use and how long it will take to reach the destination. Method arrive() is called when the object arrives to its destination. A mobile object has several specific properties like its arrival date on its parent, its travel time if it is moving... Its relativeX() and relativeY() methods are overridden to always indicate the current location of the object, while they are moving or not.
| Path Class |
As explained previously, a mobile object uses a path to move from one object to another. A path has a source location and a target location, both represented by physical objects. At any time, the location of an object on the path can be determined by the relativeX() and relativeY() methods.
By default, the path is considered as a straight line between the source and target locations, but the class can be specialized to represent any form of path by simply overriding the relativeX() and relativeY() methods to change the way to locate objects that are actually moving along the path.
| EVENTS SCHEDULING |
The simulator has a scheduler that manages the events. To create an event, the user must call one of the schedule() methods of the simulator object. The scheduler is hidden from the user so he/she can not explicitly create events. From the point of view of the user, an event is always an asynchronous call to a method of a simulation object.
 |
To allow a method to be called asynchronously, the notion of method slot is introduced. As a method is not a static pointer, it can not be a parameter of a template class, which raises technical difficulties in the design solution that we have chosen. A method slot is a class nested in the same class as the considered method. Then, instead of using the method pointer, the associated method slot will be used. For instance, the following code declares a slot for method foo_method().
class foo_class {

        ...

        int foo_method(int);

        add_method_slot(foo_method);

        ...

       };
To declare a method slot, the macrocommand add_method_slot is used. Its parameter is the name of the method to associate with a slot. As only the name is used to identify a method, the overload of methods through different signatures (i.e. methods with the same name) is not allowed here.
 |
Events in the B++ Simulator are thus considered as asynchronous calls to methods. For this purpose, several rules must be applied. First, all the simulation objects must be handled through pointers and not directly as objects (it is also important for polymorphism that is intensively used in simulation). Second, all the methods that need to be called asynchronously through events must be associated with a method slot. Finally, the arguments of such methods must be primitive types or pointers only. There are two reasons for this last rule: first, as the call is asynchronous, the arguments will be stored before the effective call to the method; second, also due to the asynchronous aspect, the state of an object may have changed between the scheduling of the event and its effective achievement. Here is an example that schedules a bus to arrive in 10 units of time on a spot.
clBus * bus = ...;

       clSpot * spot = ...;

       tyCardinal arrival = simulator().date()+10;


       simulator().schedule(arrival,bus,method_id(clBus,arrive),spot);
To schedule the arrival event, the schedule() method of the simulator is called. First, the bus object is provided, then the identification of its arrive() method, and finally all the arguments of the arrive() method. The full method identification is given by the method_id macrocommand, whose parameters are the class and the method slot.
| VISUAL REPRESENTATION |
Any physical object can have a visual representation. When a simulation experiment is run, the user can choose to create the visual representation of all the objects or not. In fact, the visual representation of an object, its view, is simply an object of class VisualComponent. This class provides several methods that are used by the graphical interface to display the whole system under study.
 |
As any physical object, a visual component has a parent (the visual component representing the parent of its associated simulation object) and several children (the visual components representing the children of its associated simulation object). When an object is added as a child of a parent object, its visual representation is automatically added to the one of the parent object (using the addInside() method).
 |
Notice that a visual component has an outside representation (that can be defined using the setOutside() method), it is what the associated object looks like when view from the outside, and if it is deep, it has an inside representation (that is defined by the children and any other graphical component added using the addInside() method). For instance, the outside view of a bus will be an image illustrating the bus from the outside, and its inside view will be the layout of the seats with its children (the passengers) seated on them. If the component is shallow, its children will be located on top of the outside view of the component in the layout of the parent of this component.
The following piece of code shows how to define the outside view of a bus object from an image in a file. This code should be in the constructor of the Bus class. It creates first a Java image component from the image file. Then, a Java visual component is built and associated with object this. Finally, the image component is defined as the outside view of the visual component.
jaString file = jaString::j_new("bus.gif");
jaImageComponent image = jaImageComponent::j_new(file);
this.view()=jaVisualComponent::j_new(simulator().frame());
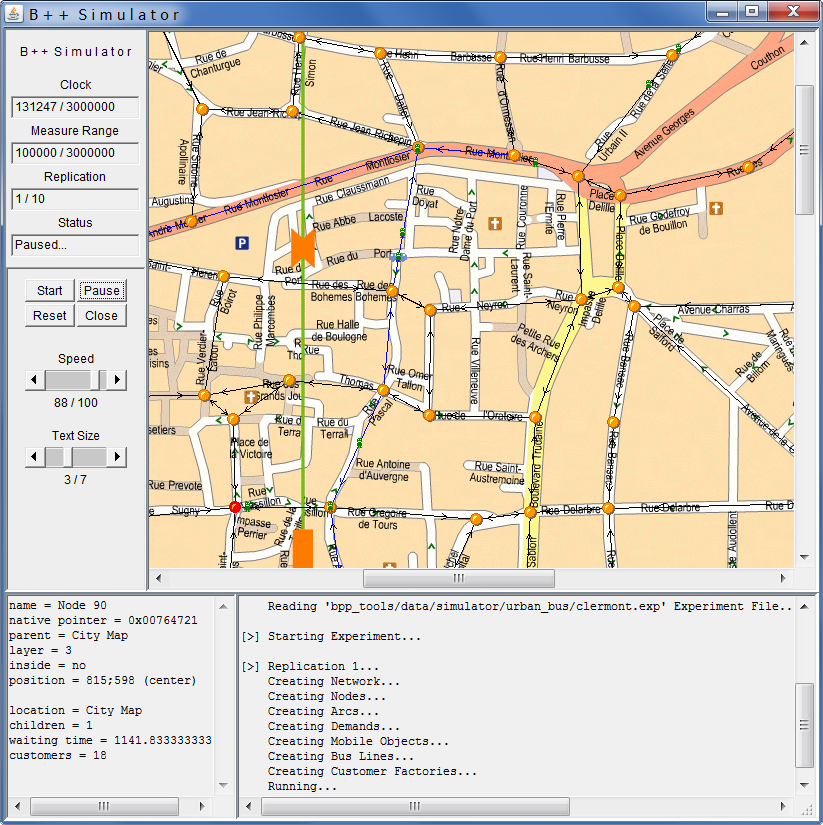
this.view().j_setOutside(image);A graphical interface, provided through the SimulatorFrame class, allows to display the run of a simulation experiment and to control it. The simulation can be sped up or slowed down, paused, stopped, restarted... and at any time the interface allows to check the state of a component, through an inspector component, and thus allows to control whether the simulation runs correctly (cf. the screenshot at the beginning of the section).
 |
| ADVANCED FEATURES |
| Classes and Methods Identification |
We present here features of the B++ Library that are necessary for the B++ Simulator framework. In the simulator, classes and methods have to be identified uniquely, and to be indexed. For efficiency reasons, we need to assign a unique number to classes and methods of the simulation objects in order to create arrays to store some properties for these classes and methods. For methods, a previous section explains the notion of method slot that allows to index the methods of a class.
For classes, the indexation is performed relatively to a given class that we call reference. To be able to do this, the reference must have a class indexer. For the purpose of simulation, the class Object of the Simulation module has a class indexer.
class clObject {

        ...

        class_indexer(clObject);

        ...

       };
To get the index of a class relatively to the reference, the user must call the class_no macrocommand as follows.
size_t classID = class_no(simulation::clObject,clCustomer); The previous example gets the index of the Customer class relatively to the reference class Object of the Simulation module. To get the index of a method, the user must call the method_no macrocommand as follows.
size_t methodID = method_no(simulation::clObject,clBus,arrive); The previous example gets the index of the arrive() method of the Bus class relatively to the reference class Object of the Simulation module.
| Pool of Objects |
Thus, in the B++ Simulator framework, each time a class needs to be identified, the class_no macrocommand with the reference class Object of the Simulation module must be used. Particularly, the simulator can use pools to allocate simulation objects.
In the Simulator class, a protected attribute, atObjectPoolS, lists the pools for all the simulation classes. By default, there is no pool for any simulation class. In order to state that a given class, e.g. Customer, must be instantiated using a pool in the simulator, a new pool has to be created, and stored at the index corresponding to the class number in the atObjectPoolS attribute.
clAbstractPool * pool = new_object(clPool<clCustomer>());

       atObjectPoolS[class_no(simulation::clObject,clCustomer)]=pool;
The definition of pools for simulation objects must appear in the constructor of the Simulator class. Thus, the newObject() method of the simulator will be able to use this pool if it exists, or will directly allocate a new object otherwise. The same way, the deleteObject() method of the simulator will correctly deallocate the simulation objects.
| Events Priority |
Also in the constructor of the Simulator class, the priority of the events can be decided. For the user, an event is always an asynchronous call to a method, which means that to identify an event, one need to identify the method associated with the event. For this purpose, the method_no macrocommand, similar to class_no, must be used.
Like for the pools of objects, a protected attribute, atEventPriorityD, stores the priority of all the events of the simulation model. By default, all the events have the same priority, set to 100. The lower is the priority value, the higher is the priority. For instance, to give the arrive() method of the Bus class more priority, its priority value must be set below 100 as follows.
site_t methodID = method_no(simulation::clObject,clBus,arrive);

       size_t classID = class_no(simulation::clObject,clBus);

atEventPriorityD[classID][methodID]=90;| Image Files |
At the experiment start, one can associate an image file with a class using a protected attribute, atImageFileS. The number of the class is used as a key to access the information. Here is an example, located in the startExperiment() method of the simulator, that associates the image bus.gif with the objects of the Bus class.
clString image = dataLocation()+fileNameSeparator()+"bus.gif";

       atImageFileS[class_no(simulation::clObject,clBus)]=image;
Notice that the dataLocation() method of the simulator class is used to locate the file. The fileNameSeparator() function returns the symbol to separate folders and files in a path, which depends on the platform. To access the image file of a class, usually to create the visual representation of a simulation object, the public method imageFile() of the simulator class is available. The following example, that should be located in the constructor of the Bus class, shows how to access the image file associated with the Bus class.
simulator().imageFile(class_no(simulation::clObject,clBus));| Loading a Simulation Model |
To run a simulation model, one just need to create a new simulator object and execute its run() method. However, to execute a visual animation of the simulation, things are a bit more complicated: the simulator needs a Java Virtual Machine (JVM) to perform correctly and a simulation frame of class SimulatorFrame. Two solutions are available.
First, the SimulatorFrame class has a main() method that allows to launch the simulator using the Java command line as follows.
java -classpath ... bpp.simulation.SimulatorFrame clermont.expThis command starts the simulator frame and loads the simulation model described in the clermont.exp experiment file. In this file, the module parameter (cf. the section on the simulator structure) indicates which dynamic library to load that contains the simulation model. In this dynamic library, specific symbols are requested. More precisely, the simulator frame is looking for the startModule() and endModule() Java native methods (cf. both the section on and the documentation on the Simulator/Urban_bus/Plugin module in for details).
Another way to launch a simulation model is to load a JVM in C++ and create afterwards a simulator frame through Jirk++. Thus, the simulator object can be created with this frame as argument, and the simulation model will be loaded in it. More details can be found in the documentation of the Simulator/Urban_bus/Console module.
| CONCLUSION |
The B++ Simulator framework provides the basic elements for discrete-event and visual simulation. It does not provide any graphic assistance interface to develop simulation models, but it is a fully functional and portable framework embedded inside the B++ Library. It integrates several specific features that should make the B++ Simulator interesting software:
a hierarchical structure of the physical objects, which is a simple and relevant approach to model systems;
an optional visual representation of each physical object, which eases the verification and validation of the simulation model;
an allocation mechanism that allows to define pools for any simulation class, and remains totally transparent to use afterwards;
a definition of events based on the fundamental object-oriented notion of message: any simulation event is an asynchronous method call;
a centralized priority assignment mechanism for the events that remains totally transparent to use afterwards, any priority assignment policy can be implemented;
a fully portable infrastructure and a direct interaction capability with optimization tools, both provided by the B++ Library.